Posted on

To transfer data from your old Samsung phone to a new one

To transfer data from your old Samsung phone to a new one, Samsung offers a seamless tool called Smart Switch. Here’s how to do it:


๐Ÿ“ฑ Option 1: Transfer Wirelessly (Phone-to-Phone)

  1. Prepare Both Phones
    • Charge both devices.
    • Connect them to Wi-Fi (or use mobile hotspot if needed).
  2. Install Smart Switch
  3. Launch Smart Switch on Both Devices
    • On the new phone, select Receive data โ†’ Galaxy/Android โ†’ Wireless.
    • On the old phone, select Send data โ†’ Wireless.
  4. Connect the Phones
    • The new phone will search for the old one.
    • Confirm the connection on both devices.
  5. Choose What to Transfer
    • You can select apps, contacts, messages, photos, videos, settings, and more.
  6. Start Transfer
    • Tap Transfer and wait until it completes.
    • Larger files (like videos) may take longer.

๐Ÿ”Œ Option 2: Transfer via USB Cable

  1. Connect Phones with a USB-C to USB-C cable (or use an OTG adapter).
  2. Open Smart Switch on both phones.
  3. Select โ€œCableโ€ as the transfer method.
  4. Follow on-screen prompts to select and transfer data.

๐Ÿ’ป Option 3: Use a PC or Mac

  1. Download Smart Switch for PC/Mac from Samsung’s official site.
  2. Back up your old phone to your computer.
  3. Connect your new phone and restore the backup.


Posted on

NEW DRYCLEANING COMPUTER PRICE

TPOS DRYCLEANING COMPUTER
2025 SCHEDULE Purchase Rent
New PC Used PC Used PC
TPOS Program $900.00 $900.00 $50.00
CPU-(New =Windows 11),ย  Usedย  (working)ย  Has 1 Yr Warranty New Used PC Used PC
15″ Touch Monitor WITH COMPUTER SYSTEM $1,200.00 $700.00 $45.00
Invoice Printer $250.00 $200.00
Cash Drawer $120.00 $90.00
BASIC Unit $2,470.00 $1,890.00 $95.00
All HW has One year warranty 1 Year 1 Year Rent
Tag Printer $350.00 $350.00
Scanner/Wireless Generic $70.00 $70.00
Scanner/Wireless Zebra $250.00 $250.00
Keyboards & Mouse
UPS Backup
BarCode Printย  $0.25,ย ย  4/$1.00
Installation/Unit $300.00 $300.00 $300.00
Discount With Credit Card Merchant Serviceย  -$400.00 -$400.00 -$400.00
https://computerbuffet.com/tomorrow-pos-for-dry-cleaners
* Refundable Rental Deposit for 1 unit $300.00
* Minimum Rental : 30 Months
Posted on

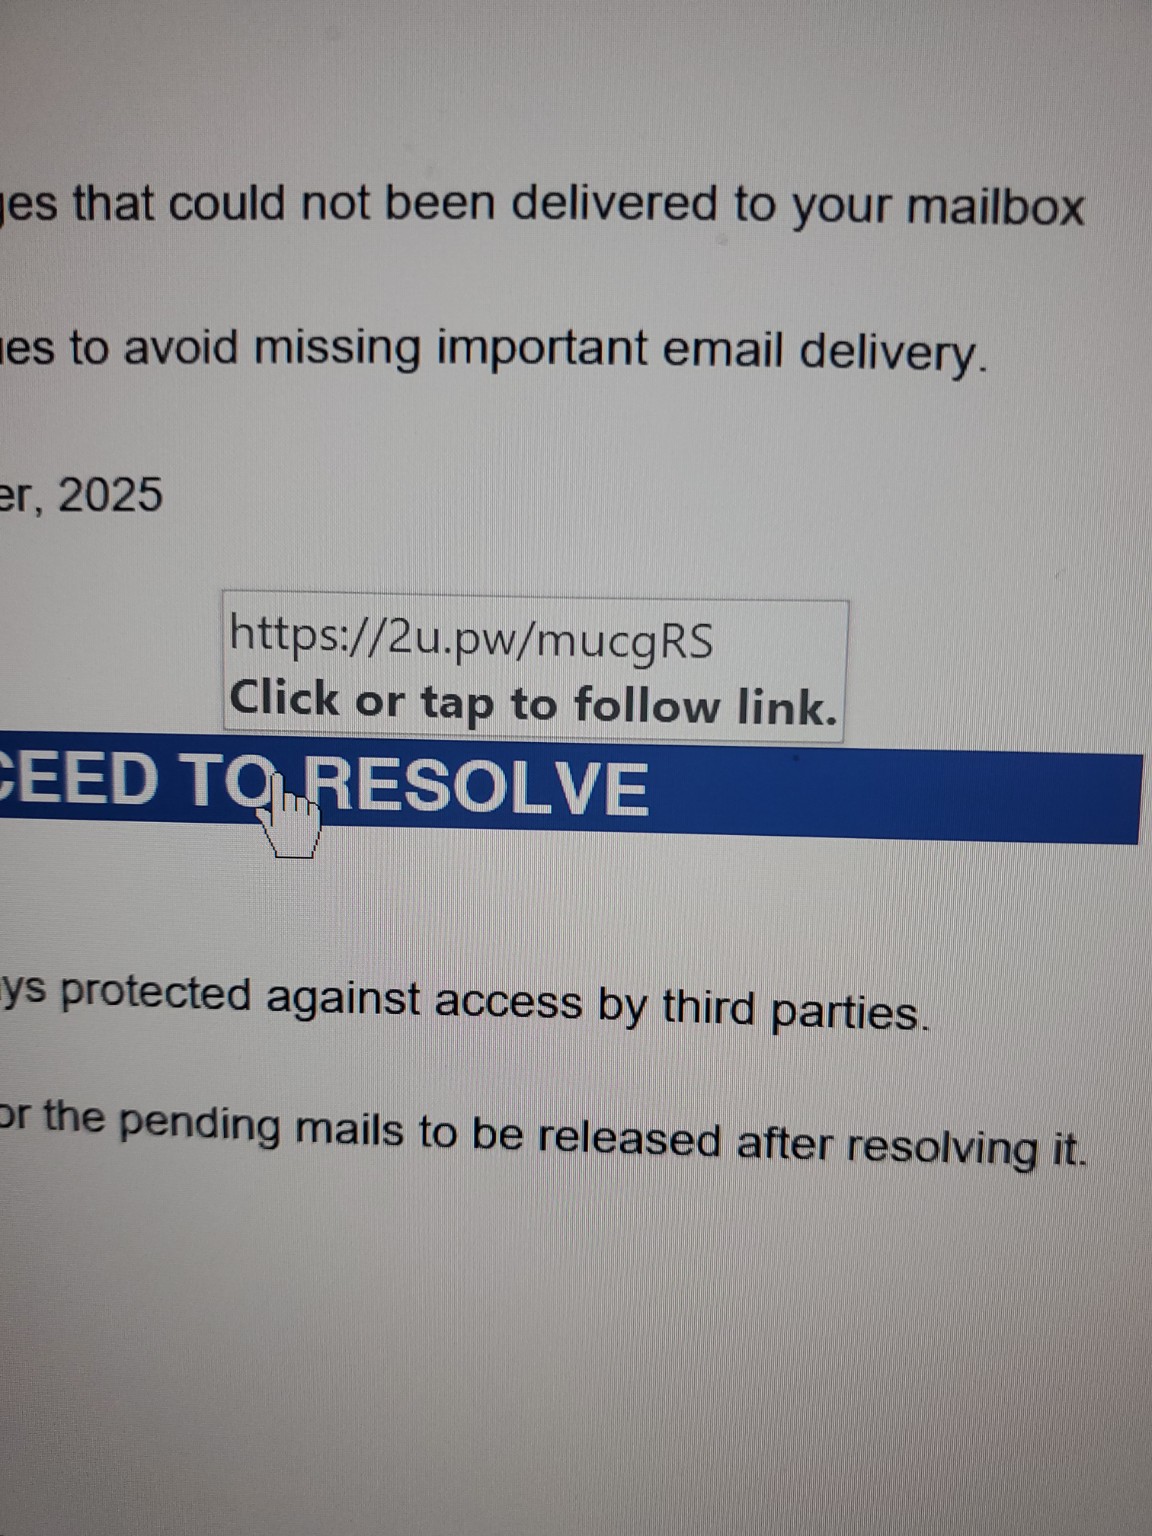
This is a phishing scam. Do NOT click that link.

This is a phishing scam.
Do NOT click that link.


Why itโ€™s a scam

  • The link uses a URL shortener (2u.pw) โ€” very commonly used in phishing.

  • The email claims there are โ€œmessages that could not be deliveredโ€, which is a common trick to make you panic.

  • They want you to โ€œproceed to resolveโ€ โ€” usually this leads to a fake login page to steal your email password.

What to do now

  1. Do not click the link.

  2. Delete the email.

  3. If you already clicked and entered your password โ€” change your email password immediately.

  4. If this email came to a work account โ€” inform IT.

Posted on

Samsung Galaxy Tab 10.1 (model GT-P7510)

Samsung Galaxy Tab 10.1 (model GT-P7510),ย  you donโ€™t have the original Google account that was previously linked.


๐Ÿ”’ Why Itโ€™s Locked

If the tablet is asking for the Google account previously synced on the device after a factory reset, that means Factory Reset Protection (FRP) is active.
FRP was added in Android 5.1+ to prevent theft or unauthorized resets.


โš™๏ธ Check Android Version

The GT-P7510 (Galaxy Tab 10.1, Wi-Fi) originally shipped with Android 3.1 (Honeycomb) and officially upgraded up to Android 4.0.4 (Ice Cream Sandwich) โ€” no FRP existed on these versions.
So if your tablet has Android 4.0 or below, you can simply:

  1. Factory reset the tablet, and

  2. Add a new Google account in the setup wizard.

If you canโ€™t add a new account, or itโ€™s asking for the old one, that means:

  • The device was flashed or modified to run a newer Android (like 5.x) ROM that includes FRP.


๐Ÿงญ Your Options

๐Ÿ…ฐ๏ธ If Itโ€™s on Android 4.x (No FRP)

  1. Power off the tablet.

  2. Hold Power + Volume Up until recovery mode appears.

  3. Choose โ€œWipe data/factory resetโ€ โ†’ confirm.

  4. After reboot, skip sign-in and go to Settings โ†’ Accounts โ†’ Add Account โ†’ Google to sign in with any account.

Thatโ€™s all โ€” no original account needed.


๐Ÿ…ฑ๏ธ If Itโ€™s on Android 5.x or Higher (FRP Locked)

If the tablet was updated with a custom ROM (e.g., LineageOS) and has FRP:

  • Youโ€™ll need the original Google account to unlock.

  • Without that account, Googleโ€™s protection prevents bypassing the lock.

Your only legitimate routes are:

  1. Ask the previous owner to remove the device from their Google account (via https://myaccount.google.com/devices).

  2. Reinstall the original Samsung firmware (Android 4.0.4) using Odin on a PC, which removes the FRP lock because that version predates FRP.

To Reinstall Original Firmware (if needed)

  • Download official GT-P7510 firmware

  • Use Odin to flash it

  • Set up the tablet with a new Google account

Samsung Galaxy Tab 10.1 (GT-P7510) to its official Android 4.0.4 firmware, which removes any Google FRP protection so you can set it up fresh.


โš™๏ธ STEP-BY-STEP: Reinstall Stock Firmware (GT-P7510)

๐Ÿงฉ What Youโ€™ll Need

  1. Windows PC

  2. USB cable (standard micro-USB)

  3. Odin tool (Samsung flashing utility)

  4. Official GT-P7510 firmware (.tar.md5 file)


๐Ÿช„ Step 1. Download Odin

Unzip it โ€” inside youโ€™ll see Odin3.exe.


๐Ÿช„ Step 2. Download Firmware


๐Ÿช„ Step 3. Boot Tablet into Download Mode

  1. Power off the tablet completely.

  2. Hold Power + Volume Down until you see two icons.

  3. Press Volume Down to select the Download (Odin) mode.

  4. Confirm with Volume Up.

Youโ€™ll see โ€œDownloadingโ€ฆ Do not turn off target!!โ€


๐Ÿช„ Step 4. Connect to PC

  • Plug the tablet into your PC via USB.

  • Open Odin3.exe.

  • In Odin, the top bar should light up (e.g., โ€œCOM3 connectedโ€).

If it doesnโ€™t, install Samsung USB drivers:
๐Ÿ‘‰ https://developer.samsung.com/mobile/android-usb-driver.html


๐Ÿช„ Step 5. Load Firmware into Odin

  1. In Odin, click the AP button.

  2. Select the .tar.md5 file you extracted earlier.

  3. Make sure only these boxes are checked:

    • โœ… Auto Reboot

    • โœ… F. Reset Time

    • โŒ Re-Partition (leave UNCHECKED)


๐Ÿช„ Step 6. Start Flash

Click Start โ€” wait a few minutes (5โ€“10).
Youโ€™ll see โ€œPASS!โ€ in green when done.
The tablet will reboot automatically.


๐Ÿช„ Step 7. Set Up Fresh

Once it boots up:

  • Youโ€™ll see the classic Android 4.0 setup screen.

  • Now you can skip sign-in or add any new Google account โ€” FRP is gone.


โœ… Result:
Your GT-P7510 is now running clean stock firmware with no Google lock โ€” ready for a new account.

Posted on

IPv6 Setup for TP-Link AX1800 with Xfinity

โš™๏ธ IPv6 Setup for TP-Link AX1800 with Xfinity

  1. Log into the Router
    • Connect to your network and go to http://192.168.0.1 or http://tplinkwifi.net
    • Login with your credentials (default is usually admin / admin)
  2. Enable IPv6
    • Go to Advanced > IPv6
    • Set IPv6 Connection Type to Dynamic IP (SLAAC/DHCPv6) This is ideal for Xfinityโ€™s stateless configuration
  3. Router Advertisement
    • Ensure Router Advertisement is enabled This allows devices on your LAN to auto-configure their IPv6 addresses
  4. DNS Settings
    • Use automatic DNS or manually set:
      • Google: 2001:4860:4860::8888
      • Cloudflare: 2606:4700:4700::1111
  5. Save and Reboot
    • Apply changes and reboot the router to ensure lease negotiation with Xfinityโ€™s DHCPv6 server

๐Ÿงช Quick IPv6 Health Check

  • Visit to confirm full IPv6 functionality
  • Run ipconfig (Windows) or ifconfig (Linux/macOS) to verify your device has a global IPv6 address
  • Use ping -6 ipv6.google.com to test connectivity
Posted on

IPv6 Setup for Netgear R6100 with Xfinity

  1. Access the Router Interface
    • Connect to your R6100 network.
    • Open a browser and go to http://www.routerlogin.net
    • Login with your credentials (default is admin / password unless changed).
  2. Navigate to IPv6 Settings
    • Go to Advanced > Advanced Setup > IPv6.
  3. Choose the Right Connection Type
    • For Xfinity, start with Auto Detect.
    • If that fails, try Auto Config or DHCP.
    • Avoid 6to4 Tunnel, PPPoE, or Fixed unless you know your ISP requires it.
  4. Prefix Delegation
    • If available, set Prefix Length to /64.
    • Enable Router Advertisement (RA).
    • Disable โ€œAllow PD/Address Releaseโ€ to prevent lease drops during rebinds.
  5. LAN Configuration
    • Enable Address Autoconfiguration.
    • Optionally enable DHCPv6 Server with a range like ::1000 to ::2000.

๐Ÿง  Pro Tips

  • Firmware Check: Make sure your R6100 is running the latest firmware. Older versions may mishandle IPv6 leases.
  • Fallback Plan: If IPv6 causes instability, disable it temporarily and rely on IPv4 until Xfinityโ€™s rollout stabilizes.
  • Monitoring: Use tools like test-ipv6.com to verify your IPv6 connectivity and DNS resolution.

โœ… IPv6 Diagnostic Checklist (R6100 + Xfinity)

  1. Firmware Version
    • Check for latest firmware: Advanced > Administration > Firmware Update
    • If outdated, download from Netgearโ€™s support site and update manually.
  2. WAN IPv6 Lease
    • Go to Advanced > Advanced Setup > IPv6
    • Confirm WAN IPv6 address is assigned (should start with 2601: or similar for Xfinity)
    • Note lease duration and renewal behavior.
  3. LAN IPv6 Distribution
    • Ensure LAN clients are receiving IPv6 addresses (check with ipconfig or ifconfig)
    • Confirm prefix delegation is working (/64 is typical)
  4. DNS Resolution
    • Test IPv6 DNS: nslookup google.com should return IPv6 records (AAAA)
    • If not, check DNS settingsโ€”try using Cloudflare (2606:4700:4700::1111) or Google (2001:4860:4860::8888)
  5. Connectivity Test
    • Visit to verify full IPv6 functionality
    • Look for โ€œYour IPv6 connectivity is fineโ€ and note any warnings

๐Ÿงช Benchmark Script (Windows PowerShell)

powershell
Write-Host "Testing IPv6 Connectivity..." -ForegroundColor Cyan
Test-Connection -ComputerName ipv6.google.com -Count 4 -Protocol ICMPv6

Write-Host "`nChecking IPv6 DNS Resolution..." -ForegroundColor Cyan
Resolve-DnsName google.com -Type AAAA

Write-Host "`nListing IPv6 Addresses on Local Interfaces..." -ForegroundColor Cyan
Get-NetIPAddress -AddressFamily IPv6 | Format-Table InterfaceAlias,IPAddress,PrefixLength

This script checks:

  • ICMPv6 ping to Google
  • DNS resolution for IPv6
  • Local IPv6 address assignment
Posted on

Common Problems from Xfinityโ€™s IPv6 Changes

  • Dynamic IPv6 Address Rotation Some users report their public IPv6 address changes daily, which disrupts secure logins, remote access, or services that rely on a stable IP.
  • Modem/Router Compatibility Issues If your modem or router doesnโ€™t fully support IPv6 or isnโ€™t configured correctly, it may cause sporadic speed drops or failed connections. One user found their modem kept trying to lease an IPv6 address and failed, falling back to IPv4 intermittently.
  • Partial Connectivity During neighborhood upgrades, some users temporarily lost IPv4 or IPv6, leading to slow speeds or inability to reach certain websites.
  • Authentication or VPN Failures Services that depend on IP-based authentication may fail if your IPv6 address changes frequently.

๐Ÿ› ๏ธ What You Can Do

  • Check Your Equipment Ensure your modem and router support IPv6 natively. Devices like the Netgear CM1200 or CM2000 are known to work well with Xfinityโ€™s setup.
  • Router Configuration On routers like ASUS or TP-Link, look for IPv6 settings under WAN. You may need to choose โ€œNativeโ€ or โ€œPassthroughโ€ depending on your setup. Avoid โ€œTunnel 6to4โ€ unless you know what you’re doing.
  • Disable IPv6 Temporarily If issues persist, disabling IPv6 on your router (if possible) may stabilize your connection. Some users report better performance sticking to IPv4 until Xfinityโ€™s upgrades settle.
  • Static IP Option If you need a consistent IP for remote access or server hosting, consider upgrading to a business-class plan with static IP options.
Posted on

Pants T-Only Back Button ์ž‘๋™์•ˆํ•จ

Ex)ย  Pants T-Onlyย  Cream

Hemย ย  Price Changeย  => Applyย  ํ•˜๊ณ ,

  1. ์ˆซ์ž๋ฅผ ๋ˆ„๋ฅด๋ฉด, ๋งž๋Š” ์–ด๋งˆ์šดํŠธ
  2. ์ˆซ์ž๋ฅผ ์ž˜๋ชป ์ž…๋ ฅํ–ˆ์„ ๋•Œ, Back Button์ด ์ž‘๋™ ์•ˆํ•จ. ๊ทธ๋ƒฅ ์ง€์šฐ๊ณ  ๋‹ค์‹œ ์ณ์•ผ ํ•ฉ๋‹ˆ๋‹ค.
  3. Hem ์„ ํ•œ๋ฒˆ ๋” ๋ˆ„๋ฅด๋ฉด, Price + Original Price
Posted on

Windows 11 ์„ค์น˜ ์ค‘ ๋กœ์ปฌ ๊ณ„์ • ๋งŒ๋“ค๊ธฐ ๋ฐฉ๋ฒ•

Windows 11 ์„ค์น˜ ์ค‘ Microsoft ๊ณ„์ • ์—†์ด ์ง„ํ–‰ํ•˜๋ ค๋ฉด ๋‹ค์Œ ๋‹จ๊ณ„๋ฅผ ๋”ฐ๋ผ์ฃผ์„ธ์š”. ์ด ๋ฐฉ๋ฒ•์€ ํŠนํžˆ Home ๋ฒ„์ „์—์„œ ์ˆจ๊ฒจ์ ธ ์žˆ์ง€๋งŒ ๊ฐ€๋Šฅํ•ฉ๋‹ˆ๋‹ค.

๐Ÿ› ๏ธ Windows 11 ์„ค์น˜ ์ค‘ ๋กœ์ปฌ ๊ณ„์ • ๋งŒ๋“ค๊ธฐ ๋ฐฉ๋ฒ•

โœ… ๋ฐฉ๋ฒ• 1: ๋„คํŠธ์›Œํฌ ์—ฐ๊ฒฐ ๋Š๊ธฐ

  1. ์„ค์น˜ ์‹œ์ž‘ ํ›„ โ€œMicrosoft ๊ณ„์ •์œผ๋กœ ๋กœ๊ทธ์ธโ€ ํ™”๋ฉด์ด ๋‚˜์˜ค๋ฉด, ์ธํ„ฐ๋„ท ์—ฐ๊ฒฐ์„ ๋Š์Šต๋‹ˆ๋‹ค.
    • Wi-Fi ์—ฐ๊ฒฐ์ด๋ผ๋ฉด โ€œ๋„คํŠธ์›Œํฌ ์—ฐ๊ฒฐ ๋Š๊ธฐโ€ ๋˜๋Š” โ€œ๋‹ค๋ฅธ ๋„คํŠธ์›Œํฌ ์„ ํƒโ€์„ ๋ˆŒ๋Ÿฌ ์—ฐ๊ฒฐ ํ•ด์ œ.
    • ์œ ์„  LAN์ด๋ผ๋ฉด ์ผ€์ด๋ธ”์„ ๋ฝ‘์Šต๋‹ˆ๋‹ค.
  2. ์—ฐ๊ฒฐ์ด ๋Š๊ธฐ๋ฉด โ€œ์ธํ„ฐ๋„ท์— ์—ฐ๊ฒฐํ•˜์„ธ์š”โ€๋ผ๋Š” ๋ฉ”์‹œ์ง€๊ฐ€ ๋‚˜์˜ต๋‹ˆ๋‹ค.
    • ์—ฌ๊ธฐ์„œ Shift + F10์„ ๋ˆŒ๋Ÿฌ ๋ช…๋ น ํ”„๋กฌํ”„ํŠธ๋ฅผ ์—ฝ๋‹ˆ๋‹ค.
    • ๋‹ค์Œ ๋ช…๋ น์–ด ์ž…๋ ฅ:
  • oobe\bypassnro
    • PC๊ฐ€ ์žฌ๋ถ€ํŒ…๋˜๋ฉฐ, โ€œMicrosoft ๊ณ„์ • ์—†์ด ๊ณ„์†โ€ ์˜ต์…˜์ด ๋‚˜ํƒ€๋‚ฉ๋‹ˆ๋‹ค.
  1. ์ดํ›„ ๋กœ์ปฌ ๊ณ„์ • ์‚ฌ์šฉ์ž ์ด๋ฆ„๊ณผ ๋น„๋ฐ€๋ฒˆํ˜ธ๋ฅผ ์„ค์ •ํ•˜๋ฉด ๋ฉ๋‹ˆ๋‹ค.

โœ… ๋ฐฉ๋ฒ• 2: Pro ๋ฒ„์ „ ์„ค์น˜ ์‹œ

  • Pro ๋ฒ„์ „์—์„œ๋Š” โ€œ๋กœ๊ทธ์ธ ์˜ต์…˜โ€ ๋˜๋Š” โ€œ๊ณ„์ • ๋งŒ๋“ค๊ธฐโ€ ํ™”๋ฉด์—์„œ โ€œ์˜คํ”„๋ผ์ธ ๊ณ„์ •โ€ ๋˜๋Š” โ€œ๋กœ์ปฌ ๊ณ„์ •์œผ๋กœ ๊ณ„์†โ€์„ ์„ ํƒํ•  ์ˆ˜ ์žˆ์Šต๋‹ˆ๋‹ค.

๐Ÿ’ก ์ฃผ์˜์‚ฌํ•ญ

  • Microsoft๋Š” ๋กœ์ปฌ ๊ณ„์ • ์‚ฌ์šฉ์„ ์ ์  ์ œํ•œํ•˜๊ณ  ์žˆ์œผ๋ฉฐ, ์ผ๋ถ€ ์—…๋ฐ์ดํŠธ์—์„œ๋Š” ์šฐํšŒ ๋ฐฉ๋ฒ•์ด ๋ณ€๊ฒฝ๋  ์ˆ˜ ์žˆ์Šต๋‹ˆ๋‹ค.
  • ๋กœ์ปฌ ๊ณ„์ •์œผ๋กœ ์„ค์น˜ํ•˜๋ฉด Microsoft Store, OneDrive, ๋™๊ธฐํ™” ๊ธฐ๋Šฅ ๋“ฑ์ด ์ œํ•œ๋ฉ๋‹ˆ๋‹ค. ํ•„์š” ์‹œ ๋‚˜์ค‘์— Microsoft ๊ณ„์ •์œผ๋กœ ๋กœ๊ทธ์ธ ๊ฐ€๋Šฅํ•ฉ๋‹ˆ๋‹ค.

์›ํ•˜์‹œ๋ฉด ์„ค์น˜ ์ค‘ ํ™”๋ฉด๋ณ„ ์•ˆ๋‚ด ์ด๋ฏธ์ง€๋‚˜ ํ•œ๊ตญ์–ด๋กœ ๋œ ์„ค์น˜ ๊ฐ€์ด๋“œ๋„ ์ œ๊ณตํ•ด๋“œ๋ฆด๊ฒŒ์š”.

Windows 11 ์„ค์น˜ ์ค‘ Microsoft ๊ณ„์ • ์—†์ด ๋กœ์ปฌ ๊ณ„์ •์œผ๋กœ ์ง„ํ–‰ํ•˜๋Š” ๋ฐฉ๋ฒ•์€ ์—ฌ๋Ÿฌ ๊ฐ€์ง€๊ฐ€ ์žˆ์œผ๋ฉฐ, Microsoft์˜ ์ •์ฑ… ๋ณ€๊ฒฝ์— ๋”ฐ๋ผ ๋ฐฉ๋ฒ•์ด ๋‹ฌ๋ผ์ง€๊ธฐ๋„ ํ•˜์ง€๋งŒ, ๋‹ค์Œ ๋‘ ๊ฐ€์ง€ ๋ฐฉ๋ฒ•์ด ๊ฐ€์žฅ ๋„๋ฆฌ ์‚ฌ์šฉ๋ฉ๋‹ˆ๋‹ค.

  1. ์ธํ„ฐ๋„ท ์—ฐ๊ฒฐ ๋Š๊ธฐ ๋ฐ ๋ช…๋ น ํ”„๋กฌํ”„ํŠธ ์ด์šฉ (OOBE\BYPASSNRO)

์ด ๋ฐฉ๋ฒ•์€ ๋„คํŠธ์›Œํฌ ์—ฐ๊ฒฐ ๋‹จ๊ณ„์—์„œ ๋กœ์ปฌ ๊ณ„์ • ์ƒ์„ฑ ์˜ต์…˜์„ ๊ฐ•์ œ๋กœ ํ™œ์„ฑํ™”ํ•ฉ๋‹ˆ๋‹ค.

  1. ๋„คํŠธ์›Œํฌ ์—ฐ๊ฒฐ ํ™”๋ฉด๊นŒ์ง€ ์„ค์น˜๋ฅผ ์ง„ํ–‰ํ•ฉ๋‹ˆ๋‹ค.
  2. ์ธํ„ฐ๋„ท(Wi-Fi ๋˜๋Š” LAN ์ผ€์ด๋ธ”)์ด ์—ฐ๊ฒฐ๋˜์–ด ์žˆ๋‹ค๋ฉด ์—ฐ๊ฒฐ์„ ๋Š์Šต๋‹ˆ๋‹ค (LAN ์ผ€์ด๋ธ” ์ œ๊ฑฐ, Wi-Fi ๋„๊ธฐ ๋“ฑ).
  3. ํ‚ค๋ณด๋“œ์—์„œ Shift + F10์„ ๋ˆŒ๋Ÿฌ ๋ช…๋ น ํ”„๋กฌํ”„ํŠธ(CMD) ์ฐฝ์„ ์—ฝ๋‹ˆ๋‹ค. (์ผ๋ถ€ ๋…ธํŠธ๋ถ์€ Shift + Fn + F10์„ ๋ˆŒ๋Ÿฌ์•ผ ํ•  ์ˆ˜๋„ ์žˆ์Šต๋‹ˆ๋‹ค.)
  4. ๋ช…๋ น ํ”„๋กฌํ”„ํŠธ ์ฐฝ์— ๋‹ค์Œ ๋ช…๋ น์–ด๋ฅผ ์ž…๋ ฅํ•˜๊ณ  Enter๋ฅผ ๋ˆ„๋ฆ…๋‹ˆ๋‹ค:
  5. OOBE\BYPASSNRO
  6. PC๊ฐ€ ์ž๋™์œผ๋กœ ์žฌ๋ถ€ํŒ…๋˜๊ณ  ์„ค์น˜ ๊ณผ์ •์ด ๋‹ค์‹œ ์‹œ์ž‘๋ฉ๋‹ˆ๋‹ค.
  7. ์žฌ๋ถ€ํŒ… ํ›„ ๋„คํŠธ์›Œํฌ ์—ฐ๊ฒฐ ํ™”๋ฉด์œผ๋กœ ๋Œ์•„์˜ค๋ฉด, ํ•˜๋‹จ์— ‘์ธํ„ฐ๋„ท์— ์—ฐ๊ฒฐ๋˜์–ด ์žˆ์ง€ ์•Š์Œ’ ์˜ต์…˜์ด ์ƒˆ๋กœ ๋‚˜ํƒ€๋‚ฉ๋‹ˆ๋‹ค. ํ•ด๋‹น ์˜ต์…˜์„ ์„ ํƒํ•˜๊ณ  **’์ œํ•œ๋œ ์„ค์น˜๋กœ ๊ณ„์†’**์„ ํด๋ฆญํ•ฉ๋‹ˆ๋‹ค.
  8. ์ดํ›„ ์‚ฌ์šฉ์ž ์ด๋ฆ„๊ณผ ์•”ํ˜ธ๋ฅผ ์ž…๋ ฅํ•˜๋Š” ๋กœ์ปฌ ๊ณ„์ • ์„ค์ • ๋‹จ๊ณ„๋กœ ๋„˜์–ด๊ฐ‘๋‹ˆ๋‹ค.
  1. ๊ฐ€์งœ ์ด๋ฉ”์ผ ์ฃผ์†Œ ์‚ฌ์šฉ (์šฐํšŒ ๋ฐฉ๋ฒ•)

์ด ๋ฐฉ๋ฒ•์€ ์œ ํšจํ•˜์ง€ ์•Š์€ ๊ณ„์ • ์ •๋ณด๋กœ ๋กœ๊ทธ์ธ ์˜ค๋ฅ˜๋ฅผ ์œ ๋„ํ•˜์—ฌ ๋กœ์ปฌ ๊ณ„์ • ์ƒ์„ฑ ํ™”๋ฉด์œผ๋กœ ์ „ํ™˜ํ•˜๋Š” ๋ฐฉ์‹์ž…๋‹ˆ๋‹ค.

  1. ๋„คํŠธ์›Œํฌ์— ์—ฐ๊ฒฐ๋œ ์ƒํƒœ์—์„œ Microsoft ๊ณ„์ • ๋กœ๊ทธ์ธ ํ™”๋ฉด๊นŒ์ง€ ์„ค์น˜๋ฅผ ์ง„ํ–‰ํ•ฉ๋‹ˆ๋‹ค.
  2. ๋กœ๊ทธ์ธ ์ฐฝ์— ๋‹ค์Œ ์ด๋ฉ”์ผ ์ฃผ์†Œ์™€ ์ž„์˜์˜ ์•”ํ˜ธ๋ฅผ ์ž…๋ ฅํ•˜๊ณ  ๋‹ค์Œ์„ ๋ˆ„๋ฆ…๋‹ˆ๋‹ค:
    • ์ด๋ฉ”์ผ: a@a.com (๋˜๋Š” no@thankyou.com, test@test.com ๋“ฑ ์œ ํšจํ•˜์ง€ ์•Š์€ ์ฃผ์†Œ)
    • ์•”ํ˜ธ: ์ž„์˜์˜ ์ˆซ์ž๋‚˜ ๋ฌธ์ž์—ด (์˜ˆ: 12345)
  3. ๋กœ๊ทธ์ธ ์˜ค๋ฅ˜ ๋ฉ”์‹œ์ง€(“์ด ๊ณ„์ •์— ๋Œ€ํ•ด ์•”ํ˜ธ๋ฅผ ๋„ˆ๋ฌด ์—ฌ๋Ÿฌ ๋ฒˆ ์ž…๋ ฅํ–ˆ์Šต๋‹ˆ๋‹ค.” ๋“ฑ)๊ฐ€ ํ‘œ์‹œ๋˜๋ฉด ๋‹ค์Œ์„ ํด๋ฆญํ•ฉ๋‹ˆ๋‹ค.
  4. ์˜ค๋ฅ˜ ํ›„์—๋Š” **’์ด PC๋ฅผ ๋ˆ„๊ฐ€ ์‚ฌ์šฉํ•˜๋‚˜์š”?’**์™€ ๊ฐ™์€ ๋กœ์ปฌ ๊ณ„์ • ์ƒ์„ฑ ํ™”๋ฉด์ด ๋‚˜ํƒ€๋‚˜๋ฉฐ, ์›ํ•˜๋Š” ์‚ฌ์šฉ์ž ์ด๋ฆ„๊ณผ ์•”ํ˜ธ๋ฅผ ์ž…๋ ฅํ•˜์—ฌ ์„ค์น˜๋ฅผ ๊ณ„์† ์ง„ํ–‰ํ•  ์ˆ˜ ์žˆ์Šต๋‹ˆ๋‹ค.

How to Install Windows 11 with a Local Account Without a Microsoft Account ์˜์ƒ์„ ํ†ตํ•ด Microsoft ๊ณ„์ • ์—†์ด ๋กœ์ปฌ ๊ณ„์ •์œผ๋กœ Windows 11์„ ์„ค์น˜ํ•˜๋Š” ๊ณผ์ •์„ ์‹œ๊ฐ์ ์œผ๋กœ ํ™•์ธํ•  ์ˆ˜ ์žˆ์Šต๋‹ˆ๋‹ค.


Windows 11 ์„ค์น˜ ์ค‘์— Microsoft ๊ณ„์ •(MSA) ์—†์ด ๋กœ์ปฌ ๊ณ„์ •์œผ๋กœ ์„ค์น˜ํ•˜๋Š” ๋ฐฉ๋ฒ•์€ ๋ช‡ ๊ฐ€์ง€๊ฐ€ ์žˆ์Šต๋‹ˆ๋‹ค. ์„ค์น˜ ํ™˜๊ฒฝ์— ๋”ฐ๋ผ ์•ฝ๊ฐ„ ๋‹ค๋ฅด์ง€๋งŒ ๋Œ€ํ‘œ์ ์ธ ๋ฐฉ๋ฒ• ์ •๋ฆฌํ•ด ๋“œ๋ฆด๊ฒŒ์š”.

๐Ÿ”น ๋ฐฉ๋ฒ• 1: ์ธํ„ฐ๋„ท ์—ฐ๊ฒฐ ๋Š๊ธฐ

  1. ์„ค์น˜ ์ง„ํ–‰ ์ค‘ ๋„คํŠธ์›Œํฌ ์—ฐ๊ฒฐ ๋‹จ๊ณ„์—์„œ ์ธํ„ฐ๋„ท ์—ฐ๊ฒฐ์„ ์•„์˜ˆ ๋Š์Šต๋‹ˆ๋‹ค.
    • Wi-Fi โ†’ “์—ฐ๊ฒฐ ์•ˆ ํ•จ” ์„ ํƒ
    • LAN ์ผ€์ด๋ธ” โ†’ ๋ฝ‘๊ธฐ
  2. ์ธํ„ฐ๋„ท์ด ์—†๋Š” ์ƒํƒœ์—์„œ “Microsoft ๊ณ„์ •์œผ๋กœ ๋กœ๊ทธ์ธ” ๋‹จ๊ณ„๊ฐ€ ๋‚˜์˜ค๋ฉด
    ๐Ÿ‘‰ “์ œํ•œ๋œ ์„ค์ •์œผ๋กœ ๊ณ„์†” ๋˜๋Š” “๋กœ์ปฌ ๊ณ„์ •์œผ๋กœ ์„ค์น˜” ์˜ต์…˜์ด ํ™œ์„ฑํ™”๋ฉ๋‹ˆ๋‹ค.
  3. ์›ํ•˜๋Š” ์‚ฌ์šฉ์ž ์ด๋ฆ„/๋น„๋ฐ€๋ฒˆํ˜ธ ์ž…๋ ฅ ํ›„ ์„ค์น˜ ์ง„ํ–‰.

๐Ÿ”น ๋ฐฉ๋ฒ• 2: ๋ช…๋ น์–ด ์ด์šฉ (Shift + F10)

  1. Microsoft ๊ณ„์ • ๋กœ๊ทธ์ธ ํ™”๋ฉด์—์„œ Shift + F10 ๋ˆ„๋ฅด๋ฉด ๋ช…๋ น ํ”„๋กฌํ”„ํŠธ๊ฐ€ ์—ด๋ฆฝ๋‹ˆ๋‹ค.
  2. ์•„๋ž˜ ๋ช…๋ น ์ž…๋ ฅ:
  3. oobe\bypassnro
  4. ์ž๋™์œผ๋กœ PC๊ฐ€ ์žฌ๋ถ€ํŒ…๋˜๊ณ , ๋‹ค์‹œ ์„ค์น˜ ๊ณผ์ •์ด ์‹œ์ž‘๋˜๋ฉฐ “์ธํ„ฐ๋„ท ์—†์ด ๊ณ„์†” ์˜ต์…˜์ด ๋‚˜ํƒ€๋‚ฉ๋‹ˆ๋‹ค.
  5. ๋กœ์ปฌ ๊ณ„์ •์„ ์ƒ์„ฑํ•  ์ˆ˜ ์žˆ์Šต๋‹ˆ๋‹ค.

๐Ÿ”น ๋ฐฉ๋ฒ• 3: ๊ฐ€์งœ ์ด๋ฉ”์ผ ์‚ฌ์šฉ

  • ์ธํ„ฐ๋„ท ์—ฐ๊ฒฐ์ด ๊ฐ•์ œ๋กœ ์š”๊ตฌ๋˜๋Š” ๊ฒฝ์šฐ,
    Microsoft ๊ณ„์ • ๋กœ๊ทธ์ธ ์นธ์—
  • no@thankyou.com

๊ฐ™์€ ๊ฐ€์งœ ์ด๋ฉ”์ผ ์ž…๋ ฅ ํ›„ ๋น„๋ฐ€๋ฒˆํ˜ธ ์•„๋ฌด๊ฑฐ๋‚˜ ๋„ฃ์œผ๋ฉด
๋กœ๊ทธ์ธ ์‹คํŒจ โ†’ ๋กœ์ปฌ ๊ณ„์ • ์ƒ์„ฑ ํ™”๋ฉด์œผ๋กœ ์ „ํ™˜๋ฉ๋‹ˆ๋‹ค.

โœ… ์ •๋ฆฌ:

  • ๊ฐ€์žฅ ๊น”๋”ํ•œ ๋ฐฉ๋ฒ•์€ ์„ค์น˜ ์ค‘ ๋„คํŠธ์›Œํฌ ๋Š๊ธฐ
  • ๋ง‰ํ˜€ ์žˆ๋‹ค๋ฉด Shift+F10 โ†’ oobe\bypassnro ์‚ฌ์šฉ

๐Ÿ‘‰ ํ˜น์‹œ ์ง€๊ธˆ Windows 11 Home ์„ค์น˜ ์ค‘์ธ๊ฐ€์š”, ์•„๋‹ˆ๋ฉด Pro ๋ฒ„์ „์ธ๊ฐ€์š”?
(Home์€ ํŠนํžˆ MSA ๊ฐ•์ œ๋˜๋Š” ๊ฒฝ์šฐ๊ฐ€ ๋งŽ์Šต๋‹ˆ๋‹ค.)